When Your Boat’s AC Stops Cooling, the TXV Is Often Why
Boat AC expansion valve repair is one of the most common fixes needed when a marine air conditioning system starts blowing warm air, freezing up, or short-cycling the compressor.
Here’s a quick overview of what’s involved:
- Identify the symptom – warm air, iced evaporator coils, or compressor cycling on and off
- Diagnose the TXV – rule out low refrigerant, clogged filters, and seawater flow problems first
- Recover refrigerant – a certified technician must recover all refrigerant before opening the system
- Replace the valve – remove line fittings, swap the TXV, lubricate new O-rings with refrigerant oil
- Recharge and test – evacuate the system, recharge with the correct refrigerant, and verify proper airflow temperature drop (12–20°F between supply and return)
If you’re a boat owner in South Florida, you know how fast a broken AC can turn a weekend on the water into a miserable experience. The cabin gets hot fast, humidity spikes, and mold isn’t far behind.
The thermal expansion valve (TXV) is a small but critical part of your marine AC system. When it fails, the whole system suffers. And because its symptoms overlap with other common AC problems, it often gets misdiagnosed — leading to wasted money on refrigerant top-offs or pump replacements that don’t fix anything.
The good news: once properly diagnosed, a TXV replacement is a straightforward repair that can restore full cooling performance. This guide walks you through exactly how it’s done.
What is a Marine AC TXV and How Does It Fail?
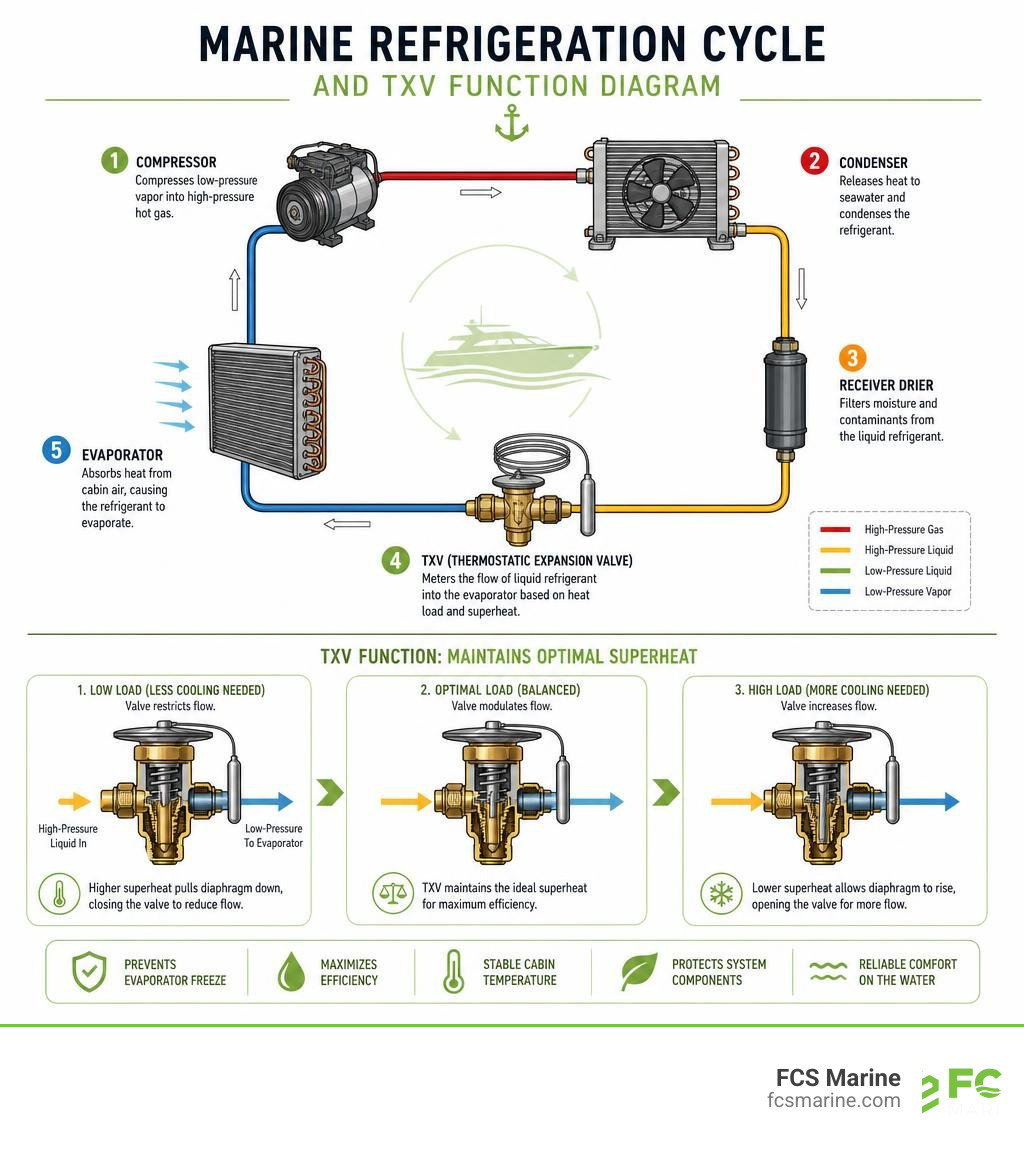
To understand why a boat AC expansion valve repair is necessary, we must first understand what this little component does. The thermostatic expansion valve (often abbreviated as TXV or TEV) acts as the gatekeeper of your marine air conditioning system.
In any refrigeration cycle, the system doesn’t actually “create” cold; rather, it removes heat. It does this through a process called phase conversion, where refrigerant continuously changes from a liquid to a gas and back again. The TXV is positioned right before the evaporator coil. Its primary job is refrigerant metering—controlling exactly how much liquid refrigerant enters the evaporator based on the temperature and pressure of the system.
The TXV uses a sensing bulb filled with a small charge of refrigerant, clamped tightly to the outlet of the evaporator coil. This bulb monitors the “superheat”—the temperature of the refrigerant gas leaving the evaporator relative to its boiling point. By constantly adjusting its internal needle valve, the TXV ensures that:
- The evaporator coil receives just enough liquid refrigerant to cool the cabin air efficiently.
- The compressor motor is completely protected against liquid refrigerant slugging (liquid getting into the compressor, which can destroy it instantly, as compressors can only compress gas).
Whether your boat uses a compact self-contained unit tucked under a v-berth or a larger multi-stage system, the TXV operates on these exact physical principles. If you’re curious about how these layouts differ on larger vessels, check out our guide on Chilled Water vs Self-Contained AC Systems.
When sourcing replacement parts, marine-grade specifications are vital. For instance, a common OEM valve like the Dometic TXV Specifications (such as the Dometic A-130) is built specifically from copper with robust 3/4″ ID threaded connections to survive the harsh, corrosive saltwater environment. Standard automotive or residential valves will quickly fail if subjected to the high-humidity, salty bilge spaces of a boat.
Over time, a TXV can fail in a few ways. The internal spring can lose its tension, the sensing bulb can lose its charge (causing the valve to stay permanently shut), or moisture and debris within the refrigerant loop can clog the tiny orifice, locking the valve in a single position.
Troubleshooting and Diagnosing a Boat AC Expansion Valve Repair
Diagnosing a bad TXV can be tricky because its symptoms closely mimic other common marine AC headaches. Before we jump straight to replacing parts, we need to perform a systematic diagnostic check.

The first step in any marine AC diagnostic is measuring the temperature differential. With the system running and the cabin fan set to high, use an infrared thermometer to measure the air temperature at the return air grille and compare it to the air coming out of the supply vent. You should see a difference of 12 to 20 degrees Fahrenheit. If the temperature drop is less than 12 degrees, your system is not cooling effectively, and it’s time to hook up a set of manifold gauges to read the system pressures.
When your Boat Air Conditioning Stops Cooling, a technician will analyze both the high-side and low-side pressures. If the TXV is stuck closed or restricted, the low-side pressure will drop exceptionally low (sometimes pulling into a vacuum), while the high-side pressure may remain normal or slightly low. This is because the refrigerant is being bottled up behind the closed valve.
For a comprehensive look at how to systematically test your system’s pressures and water flow, refer to the Marine Air Conditioning Troubleshooting Guide.
To help you narrow down the issue, here is a breakdown of how TXV failure symptoms compare to other common marine AC problems:
| Diagnostic Metric | Stuck Closed TXV | Low Refrigerant Charge | Clogged Seawater Flow |
|---|---|---|---|
| Low-Side Pressure | Extremely Low / Vacuum | Low | Normal to High |
| High-Side Pressure | Normal to Slightly Low | Low | Extremely High |
| Evaporator Coil | Iced up near the inlet | Iced up entirely or warm | Warm (No icing) |
| Seawater Discharge | Cold water flowing normally | Water flowing normally | Hot water, very weak flow, or none |
| Common Error Code | Low Pressure Fault (LPF) | Low Pressure Fault (LPF) | High Pressure Fault (HPF) |
Recognizing Symptoms That Require Boat AC Expansion Valve Repair
If your boat’s AC exhibits any of the following symptoms, there is a very high probability that a boat AC expansion valve repair is in your near future:
- Evaporator Icing: When a TXV restricts refrigerant flow, the pressure inside the evaporator coil drops. Lower pressure means a lower boiling point, causing the coil temperature to plummet below freezing. Moisture from the cabin air condenses on the coil and quickly freezes into a solid block of ice, blocking all airflow.
- Warm Supply Air: If the valve is stuck closed, no refrigerant enters the evaporator, resulting in warm air blowing from your vents. Conversely, if the valve is stuck wide open, the refrigerant doesn’t atomize properly, resulting in poor heat absorption and warm air.
- Compressor Short-Cycling: Modern marine AC units have built-in safety switches. A stuck-closed TXV will trigger the low-pressure switch, shutting down the compressor. Once pressures equalize slightly, the compressor tries to start again, only to shut down seconds later. This rapid on-and-off cycling ruins compressors quickly.
- Loss of Constant Superheat: If you measure the temperature at the evaporator outlet and find it fluctuating wildly, the TXV is “hunting”—constantly opening and closing because it can no longer regulate a stable superheat.
Differentiating TXV Issues from Other Marine AC Problems
Before condemning the expansion valve, we must rule out simpler external issues. Seawater flow problems are the number one cause of marine AC shutdowns in South Florida’s warm waters.
If your system shuts down with a High Pressure Fault (HPF), the issue is almost always water-related, not a TXV issue. Check your seawater strainer basket for grass, jellyfish, or barnacles. Ensure the seacock is fully open and that your AC pump is properly primed. Airlocks frequently occur after a boat has been hauled out or run at high speeds.
For a deep dive into resolving water flow and priming issues, see the Grady White AC Water Flow Troubleshooting discussion, which highlights how simple airlocks or worn-out pumps can easily be mistaken for internal refrigerant failures.
Step-by-Step Guide to Boat AC Expansion Valve Repair and Replacement
Once you have confirmed that the TXV is indeed the culprit, it is time to perform the repair.
A quick legal and environmental note: Under EPA Section 608 regulations, it is illegal to intentionally vent refrigerants (like R410A, R134a, or R22) into the atmosphere. This repair must be performed using proper recovery equipment.
Required Tools and Parts Checklist
Before starting, ensure you have the following tools and supplies ready:
- Replacement marine-grade TXV (matched to your unit’s BTU rating and refrigerant type)
- EPA-compliant refrigerant recovery machine and recovery cylinder
- HVAC manifold gauge set
- Deep-vacuum pump (capable of pulling down to 500 microns)
- Digital refrigerant scale
- Replacement O-ring kit (rated for your specific refrigerant)
- PAG or POE refrigerant oil (for lubricating O-rings)
- Cork insulation tape (to wrap the new valve and sensing bulb)
- Adjustable wrenches and hex keys
For detailed insights on handling these components and ensuring a leak-free seal during reassembly, review these DIY AC Component Replacement Tips.
Preparing the System for Boat AC Expansion Valve Repair
- Disconnect Power: Safety first. Turn off the AC breaker at the boat’s main AC panel and disconnect shore power.
- Recover the Refrigerant: Connect your manifold gauges to the high and low service ports on the condensing unit. Connect the center utility hose of your gauge set to the inlet of your recovery machine, and the outlet of the machine to your recovery cylinder. Turn on the recovery machine and draw the system down into a slight vacuum to ensure all refrigerant is safely captured.
- Expose the Valve: Locate the evaporator coil. The TXV is usually wrapped in black cork insulation tape to prevent condensation. Carefully peel away this insulation to expose the valve, the liquid line connections, and the sensing bulb clamped to the suction line.
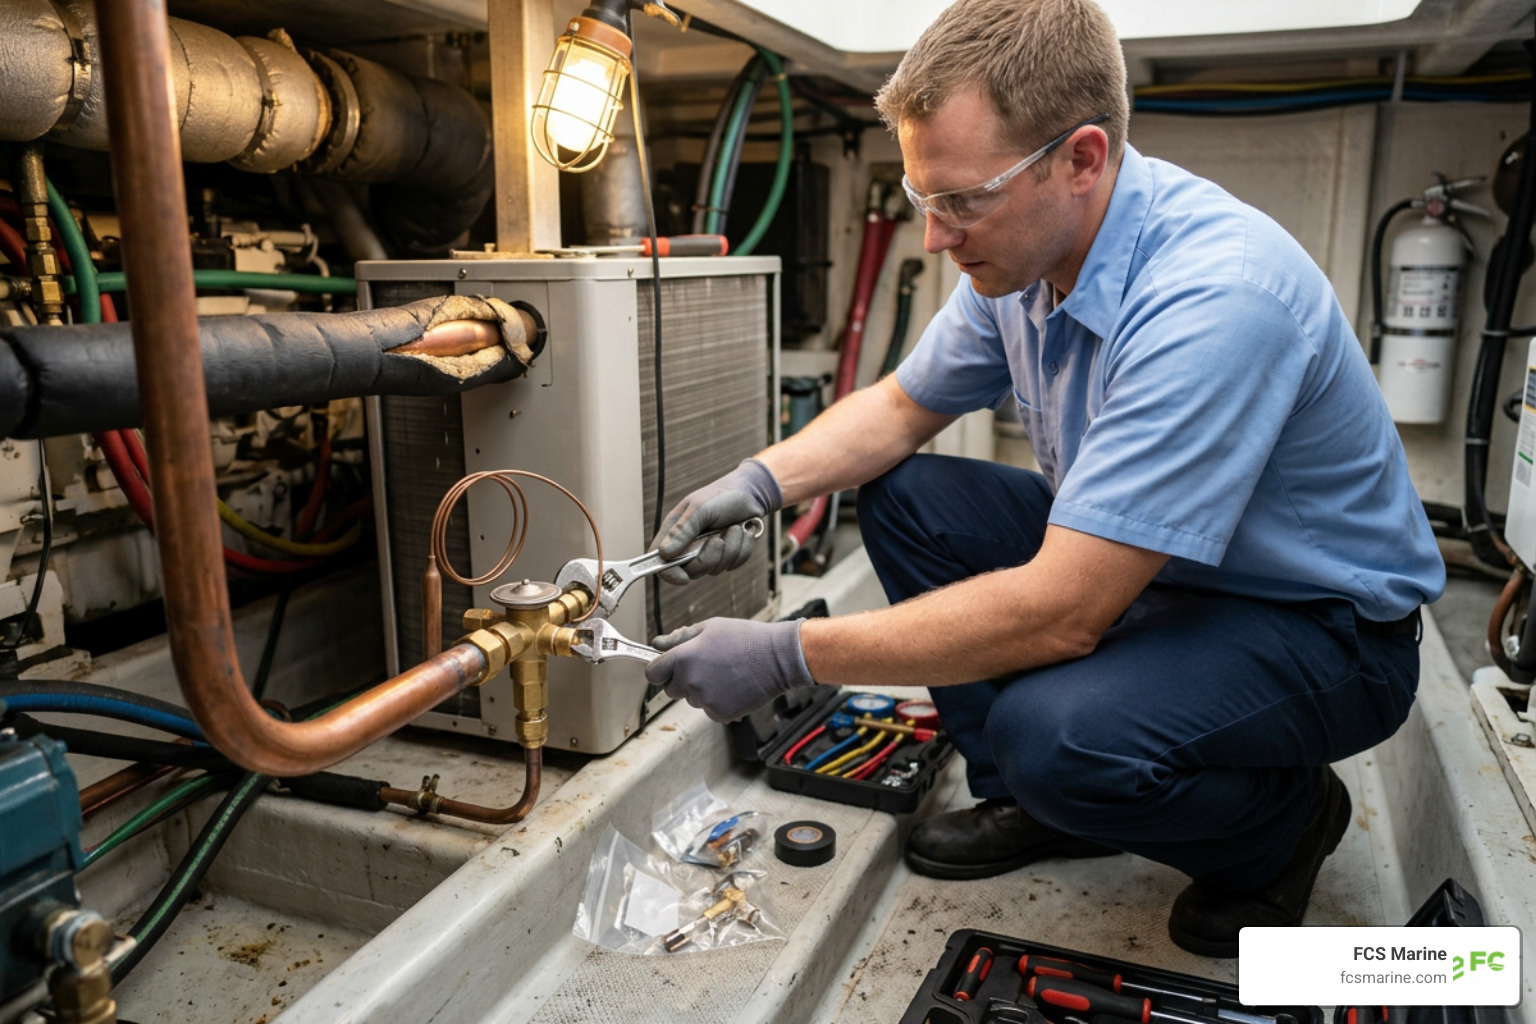
- Disconnect the Valve: Use two wrenches (one to hold the valve body and one to turn the line fitting nut) to prevent twisting the copper tubing. Carefully unbolt or unsolder the valve (depending on whether your unit uses threaded flare fittings or sweat connections). Unclamp the sensing bulb from the suction line.
- Prep and Lubricate: Clean the copper mating surfaces thoroughly. Discard the old O-rings. Fit your new marine-grade O-rings onto the line fittings and lightly coat them with clean PAG or POE refrigerant oil. This step is crucial for preventing slow refrigerant leaks down the road.
Evacuating, Recharging, and Testing the Marine AC System
- Install the New TXV: Thread the new valve onto the liquid lines, tightening the fittings securely with your backup wrenches. Clamp the new sensing bulb tightly to the suction line at the 10 o’clock or 2 o’clock position (never at the bottom where oil pools, as this throws off the temperature readings). Wrap the entire valve and bulb tightly in new cork insulation tape.
- Pull a Vacuum: Connect your vacuum pump to the center hose of your manifold gauges. Open both manifold valves and turn on the pump. Run the pump until your micron gauge reads below 500 microns. Close the gauge valves and turn off the pump. Let the system sit for at least 15 to 30 minutes to ensure the vacuum holds. If the micron level rises rapidly, you have a leak that must be resolved before charging.
- Recharge the System: Once the system successfully holds a vacuum, place your refrigerant cylinder on a digital scale. Zero the scale. Keeping the manifold valves closed, purge the air from your charging hose. Open the high-side manifold valve and allow liquid refrigerant to flow into the system. Charge the system exactly to the manufacturer’s specified weight (usually found on a silver placard on the compressor shroud).
- Test Run: Turn the AC breaker back on and start the system. Monitor your pressures. Verify that your supply air temperature drops to that sweet spot of 12 to 20 degrees below the return air temperature.
Preventive Maintenance and Cost-Benefit Analysis
A self-contained marine air conditioner has a life expectancy of about 15 to 20 years if maintained properly—with some robust older units running effectively since the 1980s. However, in the high-heat, high-salinity environment of South Florida, many units average closer to 10 years of trouble-free service before major components require attention.
To prevent future TXV failures and maximize your system’s lifespan, adopt these preventive maintenance practices:
- Clean Air Filters Monthly: Restricted airflow reduces evaporator temperature, forcing the TXV to work harder and increasing the risk of coil icing.
- Perform a Seawater Acid Flush: Over time, marine growth and scale build up inside your condenser coil. You should flush the condenser coil with a descaling solution (like Barnacle Buster or a weak acid flush) every two to five years, depending on where your boat is slipped.
- Exercise the Reverse-Cycle Valve: If your system provides heat, switch it over to reverse-cycle heating mode for a few minutes every month. This exercises the slide valve and internal components, keeping them from sticking.
- Keep the Bilge Dry: Excessive humidity in the bilge accelerates corrosion on the TXV’s external spring and sensing bulb capillary tube.
To keep your system in top shape, check out our comprehensive Marine AC Maintenance Checklist. If your system hasn’t been serviced in a while, it might also be a sign that your Yacht AC System Needs Cleaning to remove mold and dust from the blower and coils.
Repair vs. Replace: What Makes Financial Sense?
Is it worth replacing a TXV, or should you buy a whole new AC unit?
If your marine AC unit is under 7 or 8 years old, replacing the TXV is highly cost-effective. A new valve is relatively inexpensive, and the labor, while precise, is far cheaper than buying a whole new self-contained condensing unit.
However, if your system is over 12 years old, uses obsolete R22 refrigerant, or has heavy rust on the compressor chassis, investing in a TXV repair might just be a band-aid. In those cases, upgrading to a modern, energy-efficient reverse-cycle system is often the smarter, more reliable long-term investment.
Frequently Asked Questions about Boat AC Systems
How long do marine air conditioning units typically last?
A well-maintained marine air conditioner typically lasts around 10 to 15 years. In pristine freshwater environments, they can last up to 20 years. However, in South Florida’s warm, high-salinity waters, components like raw-water pumps, control boards, and TXVs are subjected to extreme wear and may require replacement sooner to keep the system running.
Can I replace a marine AC expansion valve myself?
While a highly skilled DIYer can handle the physical swap of a threaded TXV, the law requires EPA certification to handle, recover, and recharge refrigerant. Additionally, specialized tools like recovery machines, vacuum pumps, and manifold gauges are expensive to purchase. For most boat owners, hiring a professional marine AC technician is safer, faster, and ensures the job is done in compliance with environmental laws.
What does a High Pressure Fault (HPF) error mean on a boat AC?
A High Pressure Fault (HPF) indicates that the refrigerant pressure on the discharge side of the compressor has exceeded safe limits. This is almost always caused by a lack of water flow through the condenser coil. The heat cannot be transferred out of the refrigerant into the seawater, causing pressures to spike. Common culprits include a clogged seawater strainer, a closed seacock, an airlock in the water pump, or marine scale buildup inside the condenser tube.
Conclusion
A failing thermal expansion valve doesn’t mean your boating season is over. By understanding the symptoms of a bad TXV and ruling out common water flow issues, you can address the root cause of your cooling problems and get your cabin back to ice-cold comfort.
Because boat AC systems are compact and tucked into tight, hard-to-reach spaces, diagnosing and repairing refrigerant components is a highly specialized job. At FCS Marine, we provide fast, dockside marine AC repair services across South Florida—including Palm Beach County, Broward County, Miami-Dade County, Martin County, and St. Lucie County.
Whether you are slipped in Pompano Beach, docked in Fort Lauderdale, or cruising anywhere in South Florida, our family-owned team is ready to help with our signature satisfaction guarantee.
Want to see how we do it? Learn How Marine AC Service Works or contact us today to book our specialized Marine Air Conditioning Services. Don’t sweat your next weekend on the water—let us keep you cool!